|
|
|
 |
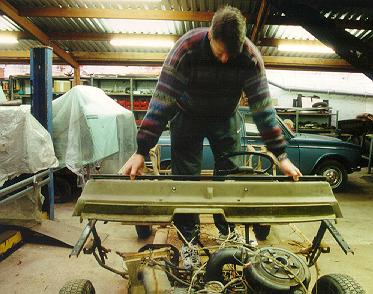
It's striptease time ! |
 |
Removing the nose
This is really easy except for one detail maybe :
remove the headlights
take off the chrome rings around them. Just pull them off . You might have to put small screwdriver between the ring and the plastic to pop them off. Each headlight is fixed with 4 small bolts. Remove them completely to make the job easy. (It works to if you remove only 2 of them and unscrew the others slightly). I just let them 'hang' at the cables and wires
drill out all the rivets under the hood
On my Mehari, the lower part of the nose was fixed to the chassis by two screws.
This doesn't seem to be original to me. Does anybody know how it was done originally ?
On each side you'll see 2 stainless steel screws.
This is the enemy ! There're fixed with a nut on the inside (behind the headlight) which is probably rusted. Since the screw can only be held with a screwdriver (and you'll never find the right size for it), you probably won't manage to block the screw while removing the nut. I succeeded in 2 out of 4.
- hint : you can drill them out but be very very careful not to make the screw too hot. It just melts through the plastic. Drill slowly and cool it with oil or water. When it starts feeling hot, just stop and let the whole thing cool off.

You can see that the front has had a kind of repair job. I guessed the car was in a small accident so I was curious to find out how bad it was. A new front was not planned in the budget !
 |
Bad luck ! Somebody tried to repair it with fiberglass which DOES NOT FIT on ABS ! |
 |
The inside looks even worse. They fitted in some metal and even more fiber so I'll just replace the whole thing. Damned ! |
 |
Doesn't she look sad without her nose ? |
Removing the sides
Now don't be afraid of this since it's about the easiest part. It's easier then it looks.
The doors
I just screwed off the doors by removing the lower hinges (three bolts) and de doorstopper (fixed on the inside with another one of those stainless steel screws, but those came off easily since there's no nut involved here). The upper hinges come off easily too. They are fixed by two inbus-screws but watch out, since they screw into some little metal plate on the door's inside. Once they're unscrewed it just falls down. Don't loose it..
The doorlock-holders
On each side, a piece of plastic is fixing the side-panel to the inner body. Just drill out the rivets and remove the plastic piece carefuly by lifting it with a screwdriver. It sits like a 'saddle' over the side and the inner body and might stick a little bit to them.
Again those stainless steel screws
Once you removed the door, you'll see three more stainless steel screws and again they don't mean fun ! Same story here...I had to drill out 3 out of 6 (Be careful ! Remember the heat which could melt your plastic)
The rivets
All around the side you'll find a lot of rivets. Drill them out in the usual way. You'll have to take of the front wheel to drill out those under the 'fender'. Those are used to fix the side panels to the front mud guards. Don't forget a row of rivets on the lower side behind the doors.
OK, ready to come of now, but...
You removed everything that holds the side of the Mehari-body, but it still seems to be stuck under the dashboard (just behind the hood). Don't worry, there are no bolts or rivets there ; it's just 'stuck' under it. I lifted/bent the dashboard's plastic slightly with a screwdriver and pulled the body-side out. No damage done.
Now you're confronted with the tubular frame for the first time. Don't be disappointed when you see rust rust and rust (if there's still some metal left anyway). This is one of the Mehari's weaker parts. On the lower part of the frame, you'll see a horizontal steel profile (if there's still something left of it) in wich the lower rivets were fixed. There was not much of it left on my car, but they are easy to replace.
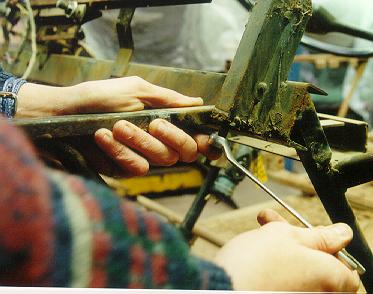
This is about what you should have right now. It looks good from this distance but we'll take a closer look. The wreck in the back is our Hudson Close up : what's left of the left side's front jack support. This is a part of the middle frame and one of the first places where they start rusting.. There's some welding to do here. The other side is even worse as you will see.
tip : if you want to inspect a Mehari, you can see this part without dissassembling the sides
Closer look at the back frame The jack support is still there (this is exceptional !) but still needs some welding. The rest (hanging down) is what's left of the bottom profile which is always a goner. tip : if you want to inspect a Mehari, you can see this part without dissassembling the sides
The right side is worse ; you already see the broken lower steel profile. I told you the front jack support is the first one to die ; here's the proof. tip : if you want to inspect a Mehari, you can see this part without dissassembling the sides
And this is the cars back 'corner'. The upright tube has some rust damage (similar on both sides). Some minor welding job.
Warning : When the car is complete, you can hardly see this part so it'll always be a surprise.
Removing the tail gate
No problems here : remove the tail-lights (just some rusty screws and wires. I had to drill the screws out), and then the usual rivets and bolts. Piece of cake !
Removing the inner body
We're almost there now, hang on ! There's only the dashboard and the inner body left, so let's start with the latter. Basically, there's not much to do :
- take the seats and seatbelts out
- remove the wiring under the dashboard out
- remove the pedals
- remove the handbreak lever and choke-button
- remove/lift the steering column
Removing the seats and seatbelts
Not really nice to do. Each seat is fastened to the chassis by 4 bolts through the chassis' seat support (take a look at the manual to get the picture). If you have a 4-seater, there's no real problem but with my 2-seater, there's a lack of space to reach the bolts. All the bolts have a nut on the chassis-side, which is covered by a small metal strip to block it when you want to remove the bolts. Sounds easy but the fact is that the nuts were so rusted that they turned around anyway.The passenger seat is the most difficult one : the outer screws are easy. Just remove the coverplates with a hammer and a chisel and block the nuts with a vise-grip our a wrench. The 2 inner nuts are not reachable on the chassis-side so I couldn't block them. I used a chisel and a grinding disc to cut the head of the front one off, but I had to cut the seat's legs anyway to reach the back bolt. I'll just have to weld it together later.
The driver seat is easier to remove. It is adjustable and the seat itself is fixed to a frame by means of 6 horizontal screws. They're quite easy to unscrew but on a two-seater there's nut enough space to remove them completely. I just had to cut them off. After that, the frame is to be handled just like the passenger seat, but at least you can get to all the bolts now.
No problem with the seat belts.
Removing the wiring under the dashboard
This is the last time you'll drive your Mehari for a long time : remove the battery first
- take out all buttons (clipsed) and remove the wires (I didn't label them but you'll better do so)
- remove the cover under the steering wheel
- remove the blinker lever and lightswitch (Label the wires and remove them)
- remove the instrument panel (2 clips, to be pushed with a small screwdriver)
- unplug the cabling from the instrument panel.
You can pull the complete cable tree through the hole in the inner body and leave it in the engine compartment.
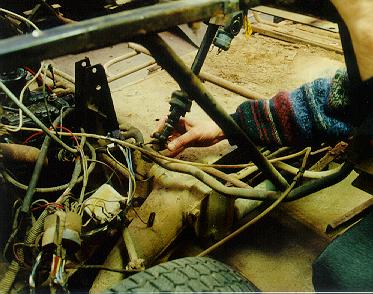
Removing steering column (see drawing)
On top of the steering column, under the dashboard, there's a tiny bolt to remove (4). It holds a metal ring (3) which you can slide down afterwards. Now -turn the steering wheel if necessary- you get access to a second ring (2) inside the steering column guide. 2 inbus screws to remove there. Now this ring slides down too.
The steering column is fixed under the hood by a clamp (14) which is fixed with -hard to reach- bolt. Remove the bolt (16) completely and slide the clamp down. Widen the groove in the steering column with a screwdriver and now you should manage to pull it as high as possible.
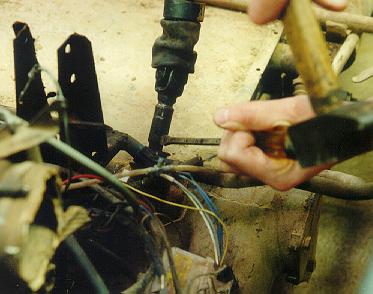
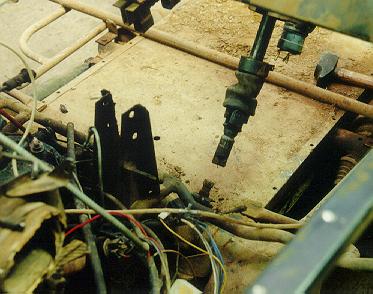
Now this is for real
(I already removed the inner body and dashboard to make it clearer)Remove the clamp-bolt
Widen the groove with a screwdriver or chissel and a hammer (just a little bit is enough) Pull up the steering column high enough so you can remove the inner body
(might need some hammer-force :-)
Removing the pedals
The best way to do this is remove the pedals together with the main brake pump (under the hood). Start by removing acceleretor cable and clutch cable. Remove all brake fluid reservoir (just pull it off) and brake fluid pipes from the main brake pump. Remove bolts from the pedal set holder and pull it all out in one piece to the inside of the car.Remove the handbrake lever and support
This is quite obviousRemove gear lever (umbrella stick)
Remove the connection under the hood, unscrew the lever support from the dashboard frame and pull it out in one pieceRemove the heating
Remove all pipes under the dashboard, unscrew the air dispenser under the dashboard and take it out. (You need two people : one unscrewing under the dashboard, one to hold the nuts under the hood. If you have Urang-Utang arms as I have, you can do it alone)Removing the inner body
Remove all the bolts and just lift it out by tilting it (lift it up at the back and pull it out backwards). It's a little bit stuck under the dashboard so you'll definitely need somebody to help you here. Sorry, I forgot to make a picture in all my excitement but it's quite obvious.
Finally : there's still the dashboard to take out
Two large nuts under the dashboard and two screws on top of it attach the windshield support frame throught the dashboard's plastic on the middle tubular frame. (On the picture below, the dashboard is already removed to make the picture clearer)
Remove them all and you should be able to push the frame up and slide it out of the plastic. Warning : this thing can be stuck completely (aluminium oxide !). Use a good hammer if necessary.
Remove the glove compartments lock.
Remove the vent holes in the dashboard. Theoretically you should be able to turn the outer plastic ring on the dashboard counterclockwise and pull the vent-holes out (don't forget to remove the air pipe). If this doesn't work, remove the 2 screws under the dashboard (not easy !)
End of the body story ! Now it's the frame and chassis