|
|
|
 |
How to repair the plastic Mehari body |
 |
There's a lot to tell about repairing a ABS (that's Acrylonitrile-Butadiene-Styrene for friends) body.
ABS is a thermoplastic which means the plastic gets soft when heated (and melts when you're exaggerating :-)As you'll see, this is kind of an advantage to do our repair !
Another thing about ABS is that it can be dissolved. The best solvents you can use are Acetone and Methyl-Ethyl-Keton (MEK or MEC). I used Acetone.
My car had about all the possible damages a Mehari can get, so here is how I did it :
How to....
Make some ABS putty
Repair a crack
Repair a small hole
Repair a big hole
Fixing bent surfaces
The ABS Putty
Cut some ABS (I used the old Mehari nose. It became the perfect donor) into small chips (eg 2mm x 2mm). Put them in a glass jar with a good lid (I used an old marmelade jar). Add some acetone (not too much) and stir it with some non-dissolvable item (I used an old kitchen knife), until the chips are completely dissolved. This will be your putty to use. Be careful, acetone is highly flamable ! Also, close the jar tightly after use since the acetone evaporates quickly. If this would happen, just add some acetone and start stirring again. It can be done over and over again.
You can make the putty very sticky (little acetone) or very liquid (more acetone) as you see on the picture below.
Repair a crack
Start by sanding the broken surface on both sides. It should be very clean !
Theory
What to do What it looks like
(click the pictures to zoom in)
This is how it could look like before you start. Try to bring the broken surface into it's original shape, using tape (aluminium tape is perfect but paper tape works fine too) If accesible, glue a piece of ABS on the backside (if reachable) to strengthen . This is the best repair but not always possible Using a hot soldering iron, change the crack into a V-shaped groove. The wider the better. Pour (liquid) or smear (sticky) putty into the V-shaped groove. Best results when smeared but more sanding afterwards ;-( If the crack isn't 'stable', only start by filling some centimeters close to the tape.
Let it dry overnight, remove/replace the tape, fill another region till the whole crack is filled
Doing the same thing on the back side (if no ABS has been sticked on) is better
Rasp the most protruded, dried putty and sand it afterwards. If not satisfied, add new putty on top of the old and sand again after overnight drying.
Repair a small hole
This goes much faster. You need some liquid ABS-putty and a piece of ABS. Again, start by sanding the damaged region on both sides. Also the piece of ABS we'll stick on the hole should be sanded. This method works for holes with a size of some centimeters.
Theory What to do What it looks like this is the problem. Somebody installed a larger wiper-switch in the dashboard and had to cut out some ABS 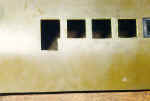
the front side
back side with donor pieceUsing a silk brush (no nylon since it dissolves in the aceton), dab some pure aceton on the backside around the whole till the surface becomes sticky. Do the same with the piece of ABS we're about to glue on it. Fit the donor-piece on the backside and firmly hold it with a pair of pincers, using two wooden blocks to avoid damage. Let it dry for an hour or so After having removed the pincers, fill the frontside with liquid ABS-putty. Since the putty will shrink after the acetone evaporates, fill the hole till the putty get's higher then the original surface
this is another hole which is just filled with liquid putty.Let dry overnight Finally, there's just the boring sanding to do.
| Theory | What to do | What it looks like |
 |
This is the hole |  |
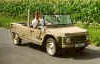
| Find yourself a donor piece and make it larger
then the actual hole. Here's doctor Jos� cutting out the donor piece for me. Thanks Jos� ! The man on the left is Kristof, his Mehari is on the background. Go to the gallery to get a closer look |
  |
|
  (drawings don't show backside supporting pieces) |
Cut the hole and the donor piece till they fit. Glue some ABS pieces on the backside so that they'll support the donor piece |     |
|
For big holes, you can't use the
'put-acetone-on-both-sides-and- glue-it-together-technique', since the acetone evaporates
too quickly. I applied putty on the supporting ABS and put the donor piece on it. (By
mistake, I cut my donor piece in three so I had some extra work to do). To fill the remaining space, I used the 'dripping technique' since that putty won't have to support anything. It's just for filling. Sanding afterwards of course |
    |
| What to do | What it looks like |
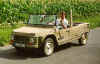
| Before whe start repairing dents, here's some food for real Mehari-lovers. Remember I wanted to transform my 2-seater into a 4-seater ? This is a 4-seater inner body I found. It's a '69 model but will be traded for a later model |  |
| How do I know it's a '69 ? It's the only
4-seater model with a 'console' between the front seats. Very rare !! The same console is only found on 2-seaters. |
 |
| Not easy to see but there's another difference
between older and younger models : On the older types, the sides (just behind the doors)
are completely flat. The younger models have a profile. New hinges don't fit on old models ! |
 |
| So I traded it for a younger model. It wasn't
as good as the old one since it had been painted AND had been in an accident. Here's the
dent under the right door. I can tell you this : it looks better on a picture then in reality :-< |
 |
| And this is the perfect left side. |  |
| Just support the surface on the backside so you
won't bent the damaged surface too far. I used some wood for it. Then heat the surface carefully with a hot air blower. DON't BURN THE PLASTIC! Just make it hot enough till it can be bent. |
 |
| And then, just push it gently in the right shape using some wood (it's too hot for your fingers !). Just a little bit at the time : heat & press & heat & press... |  |
| Till you obtain the result you wanted. Here's
still some bending to do and a remaining crack to fill but I'm quite happy with the
result.
(finally, let your wife do the sanding :-)) |
  |


 (drawings
don't show backside supporting pieces)
(drawings
don't show backside supporting pieces)