|
|
|
 |
Mehari assembly |
 |
Finally I got there ! All we have now are bits and pieces. Let's put them together :
First the chassis
- After cleaning, cutting, welding and painting your Mehari-platform should be ready now
- Prepare your axles :
- Back axle
If you need to replace the brake tubes, do it BEFORE mounting the axle on the chassis. It's far more easy. Of course, you have to install the swing arms first.
- Front axle
Check the pivot pins at your wheels. If you have to replace them do it now (this is NOT an easy job). It's easier to replace the pins when the swing armes are unmounted. Once ready, put the front axle together
- Install the small stuff on the chassis (rubber stoppers, tube holders...)
- Now you can install both the axles on the chassis
- Remount the damper / spring pots on the side
- Connect damper / spring pots to the axels
- Remount shock absorbers (mind their orientation !)
Now the small body-fitting-test (preferably before you did the paint job)
I had to do this because I repaired the dent in the bassin. Otherwise this wouldn't make much sense when the body is separated from the chassis Hm, the repaired dent looks good...enough
Now the welding check
To check if the frame is straigth enough to mount, and the dimensions are ok (the jack supports where gone, remember , I had to do some 'estimations' as far as their size was concerned)
- Put middle and front frame on the chassis and fix them temporarly
It still fits on the platform
Here's a nice engine view (takes 20 minutes to put it back in place)
Look at the top horizontal bar. It's NOT straight - Replace the bassin (inner body) temporarly and see if it fit's entirely (all holes should correspond with frame-holes). This is the ultimate test for your welding job. If necessary, correct your welding job
- Replace the sides temporarly and see if everything fits.
this looks good, but the inside basin isn't put back in place, so I have to count an extra 5 mm same here Notice the top part of the vertical bar. It's smaller there to fit the ailerons' inside. I used a 25 mm bar for the bottom and a 20mm one for the top. It's better then the original where the top part is cut through and bent to fit...but it stays open for welcomes water and dirt. - Check the distance between side panel and the mounting places for the horizontal bar. They have to be the same everywhere
By the way, once you install the bottom horizontal bar on the sides, it has to be mounted exactly 130 mm from the top of your frame (measured top to top) starts looking like a Mehari again
- Try fitting the back panel if you welded the frame in that neighbourhood ! It often happens that the frame's backside is too small after welding. The panel won't close anymore or it will scrape against the inner body ! I had to correct this.
- If everything fits you can take the body and frames off again.
Ready to get them sandblasted and galvanized
and they need it especially the wheels
In the mean time... some smaller jobs
 |
Some upholstery to do. Nice change of work |
And here they're back, nice and clean
 |
and rather expensive |
 |
At least I can spray the wheels in the open air. All that spraymist is killing me when spraying in the garage, even with good ventilation |
 |
Don't forget to paint at least one perfect wheel's inside
since your spare tire will be visible from the inside. Sandblasted, surfacer, primer and filler and final coat. New wheels would have been cheaper :-) |
And now back for the body...the paint job !
|
ABS needs a special surfacer (only a thin layer is enough)
and it sure is expensive. If you won't apply it, the final coat will peel off ! |
 |
And after some careful sanding of the surfacer, I hung them up, ready for the final coating. I prefer spraying it all in one go |
 |
Looks like some cheap horror movie...a Mehari floating around in the garage |
 |
But the result is quite good. Don't forget to spray part of the inside of your side panels since you'll see it when you open the hood |
 |
It made me really happy to see the parts in their final stage |
 |
And even this huge fan had trouble keeping the garage free of spray fog |
 |
I even painted more then a Mehari. It's hard to keep plastic parts in place when you blow 4,5 bar on them :-) |
Let's start assembling...
 |
First the dashboard and then the basin back in place. Some parts (pedals, gearshift, ventilation, pushbuttons...) are already put in place. The ventilation is one hell of a job ! |
 |
But it seems ok now |
| And now some thorough instrument panel cleaning. My God
what an amount of sand there was in it ! Don't try to remove the dials and gauges from the white plastic (it breaks off !) |
 |
 |
And this is how you can fit a 2 meter body into a Mehari. Connecting the speedometer cable here. You better do it BEFORE you install your seats. |
| Connecting gear shift, pedals, cables... And don't forget to paint a part of the basin's outside since you'll see it under the hood |
 |
 |
Now the seats are put back in place (I still have to redo the passenger's seat upholstery. Take a closer look and compare left and right) |
 |
Hmm...seems like a little bit more bending to do to
straighten the frame...this is the way I did it :-) (actually, it required 2 pairs of legs) |
 |
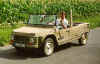
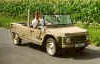
And now ... back to the back. It fits better now |
| After putting the windshield back, this is what you'll
see... Notice I also connected the wiring. Not too much trouble if it still has the original colors (I'll add an electrical circuit later. It helps) |
 |
 |
And the first side is back in place. You better rivet the canvas hooks on it before you assemble the side. |


